


In case you missed it see what’s in this section
Let's Talk
Your Total Guide To Business
MailChimp and GDPR: How to Set up a Subscriber Opt-in Form
As you all know by now the General Data Protection Regulations come into force on 25 May this year and marketers therefore need to think about how they're going to make their email marketing strategies GDPR-compliant going forward. Read this blog from Virtuoso Assistant to find out more...
In this tutorial I'm going to show you how to use MailChimp's new GDPR tools to -
- Create an email opt-in form for new subscribers using their new GDPR form fields
- Segment your email list so that you only send the right emails to the right people according to subscriber preferences, and
- Send out a quick re-permission email to current subscribers to ensure they've opted into your List as stipulated by the Regulations.
Video Transcript & Resources
A Note About MailChimp GDPR Sign-up Forms
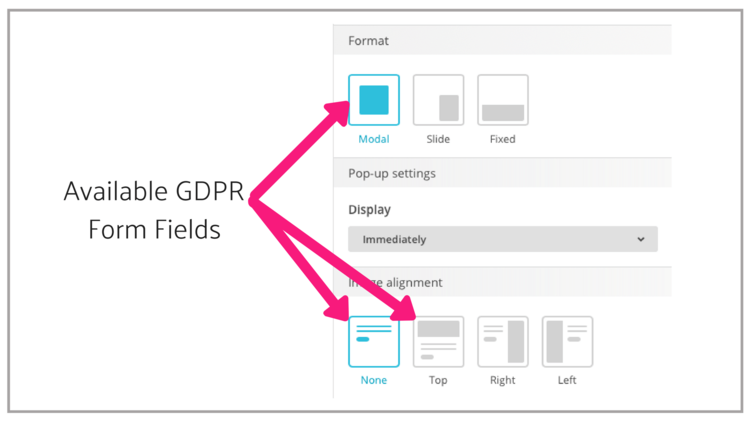
Before I start I need to point out that MailChimp's GDPR form fields are NOT available for -
- embedded forms
- form integrations

- only subscriber pop-up forms that use the Modal design format and either the none or top image alignment.
Step #1: How to Create a GDPR-Compliant Sign-up Form
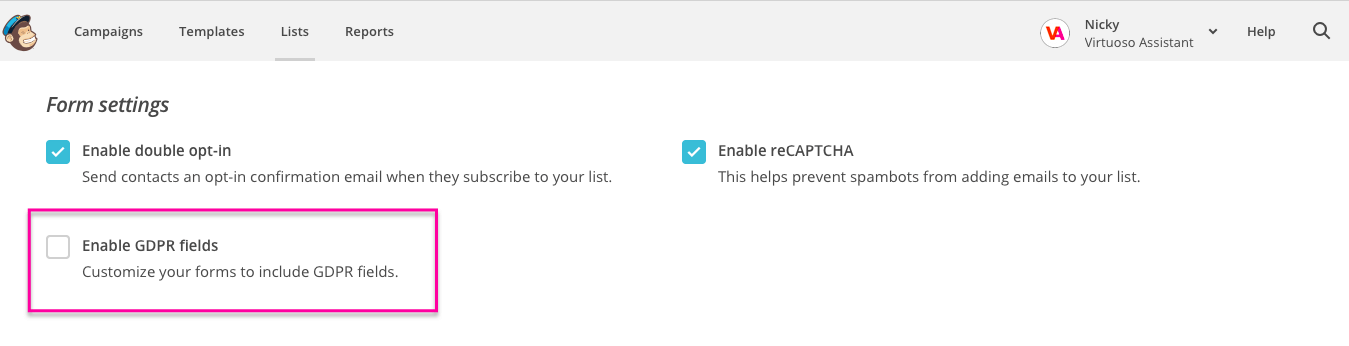
Firstly select an email List you'd like to add GDPR form fields to; it can be an existing or a new List. Select the Settings tab on the right hand side from the pull-down menu.
Now click on the List "Name and Defaults" sub-heading and you'll see a check box to enable GDPR fields. You're going to add a tick in the box. Please remember to Save using the button right at the bottom.
Heading back up to the top of your screen click on the "Sign Up Forms" tab and select the "Form Builder".
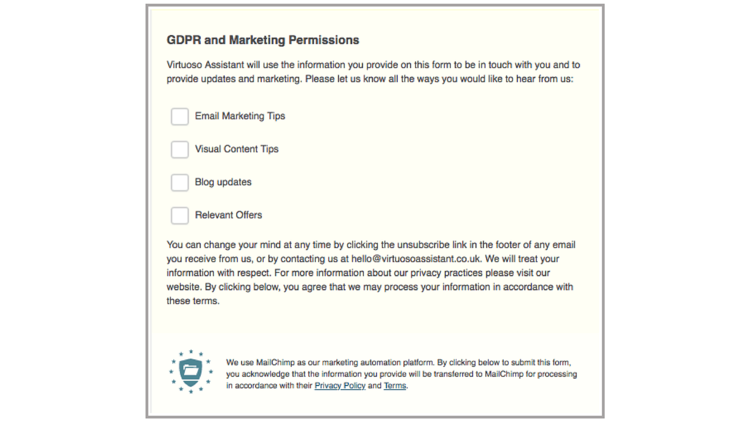
This will bring up your Sign-up form; scrolling down you'll see where MailChimp have added the new GDPR fields right at the bottom which it has called "Marketing Permissions".
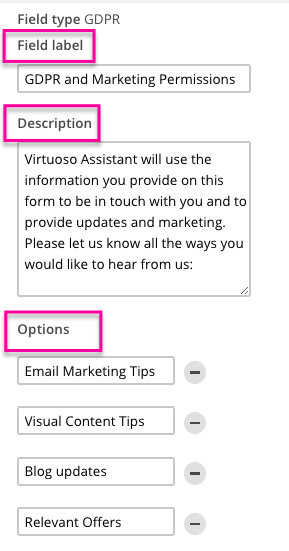
Customising GDPR Form Fields
To start customising form fields hover over the section and right click it once to select it. On the right hand side you'll find your GDPR field settings. If you don't like the sound of "Marketing Permissions" in the Field Label you can overwrite it and call it something else.
The "Description" section explains why you are collecting data on your form. Again you can edit the text according to your business needs.
Underneath the "Options" section is very important and it is here that you're allowing subscribers to choose exactly what kind of emails they'd like to receive from you. This is what GDPR means by "Granular Consent". So you need to think very carefully about this before you add your own options. You can keep adding options by clicking on this Add An Option button. Remember that each marketing activity you carry out must be clearly communicated and requires separate consent.
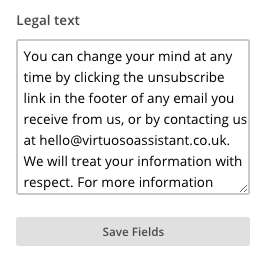
Finally the "Legal text" underneath is again customisable and explains how you will use contacts' data. You will need to include the identity of the organisation which is collecting data (which is you) and include your contact details. Let subscribers know very clearly how they can edit their preferences or unsubscribe from your emails. It is not acceptable to make subscribers jump through a series of hoops to unsubscribe. It must be a clear and easy process. Make reference to your Privacy and Cookie Policy in this section if it is appropriate.
Since it is not possible to add any links here I always add a short paragraph in the body of my sign-up form to include a link out to my Privacy Policy just to be absolutely sure that my visitors have the right information before subscribing.
 Once you're happy with all the information you've added be sure to Save Fields at the bottom.
The little section right at the bottom of your Marketing Permissions is not customisable since it indicates to your subscribers that their data will be stored on your MailChimp account and therefore includes a link to their Privacy Policy and their Terms.
Step #2: Segmenting your Email Lists
The next step to becoming compliant is to segment your Email List according to your subscribers' preferences to ensure you only send out emails that they've requested from you.
So from your sign-up form go to the top of the page, select the "Manage Contacts" tab, and View Contacts. You'll want to create as many segments in your List as you have Options in your GDPR form field. So click on the tab that says "Create a Segment". Make sure first of all that the Auto-Update option is enabled so that new subscribers will automatically be added to each segment as they opt in.

To create your first segment you'll want to ensure that your "CONTACTS MATCH...ALL"...and then choose one of the email preferences from your form field. Once you've done that you can preview the segment you've created, and then "Save as a Segment". You can add up to 5 segment conditions for subscribers who indicate a preference for more than one option in your form field.
Step #3: Obtaining Consent from Subscribers
 This is the final step so you're nearly done.
From the moment you enable your GDPR form fields any new subscribers will automatically be added to the relevant segments in your List. However, what do you do with subscribers who opted in before you added the GDPR form fields? You need to give them the same chance to select their email preferences and they also need to know about how and for what you're collecting their data.
If you've manually added any subscribers to a List this is your chance to have them opt-in properly so you have a record of when and how they subscribed, should you ever be challenged.
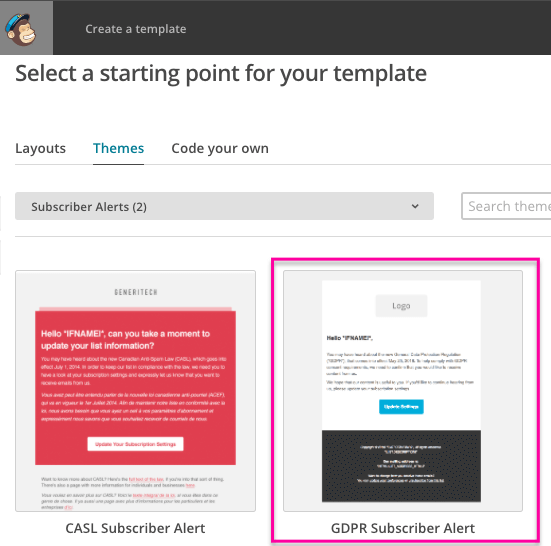
Fortunately MailChimp have created a really easy solution to this problem by providing a handy "GDPR Subscriber Alert" template.
To find it head over to the "Templates" tab on your dashboard, click on "Create Template" and select "Themes". You'll see a pull-down menu underneath and right at the bottom you'll see "Subscriber Alerts". Click on it and you'll find 2 templates; the one on the right hand side is the one you need so double-click it to bring it up onto your dashboard.
Like all MailChimp templates this one is totally customisable so you can add your own brand style, upload your business logo and edit the template according to your needs. You may want to design a new subscriber alert campaign for each separate List you have.
Worried about Losing Subscribers?
Please don't worry that you will lose subscribers by asking them to re-subscribe to your List. It may feel counter-intuitive but, actually, this is a positive step to take since you will be left with a List of subscribers who are genuinely interested in you and what your business offers. It's far better to have a small core of truly interested subscribers than a huge list of people who aren't bothered and who rarely open your emails.
Always be sure to point out the benefits of opening your emails, so let subscribers know at this point that by re-subscribing they will only ever receive an email from you from time to time that is totally relevant to their interests and needs. Bear in mind that one of the main reasons why people hit the Unsubscribe button is that (1) email content is irrelevant to them, and (2) they receive too many emails.
You also might want to include a short paragraph underneath to say that you will remove subscribers from your List if you don't hear from them within a certain amount of days. There are only a few weeks left until 25 May so you'll need to do this before then in any event.
Was this helpful? You can also subscribe to Virtuoso Assistant's YouTube Channel so you stay up-to-date with all the latest email marketing tips and advice.


Weather in Swindon
Listings